How to use Refine Edge in Photoshop to make a vignette
Refine Edge in Photoshop is an easy, fast, and consistent way to make beautiful vignettes
Here in the southwestern desert at Desert Life Design, we use graphic design, photography, and creative writing to create a compelling call-to-action.
It's easy to make vignettes with Photoshop's Refine Edge dialog box
by Doug Martin
Desert Life Design™
Besides using the Brush tool to make a vignette in Photoshop, I also love to use the Refine Edge selection. The Refine Edge dialog box has a simple Feather adjustment for a quick and easy vignette.
With the Refine Edge along with a Layer Mask, you can create a vignette that fades out to the background. The background could be white or transparent, or might even include a background color or image.
7 easy steps to use a Layer Mask in Photoshop to make a vignette
1. Open image in Photoshop, or place image in already-open document
In my example, I opened an image. I renamed the background layer to “Lucky” so I could add layers underneath my image layer. Lucky was a fiercely loyal chihuahua with a courageous spirit that still lives on.
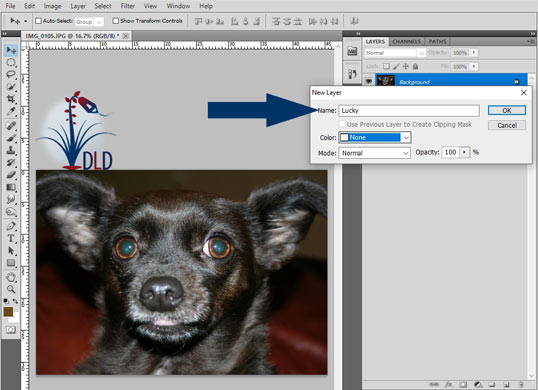
First, open an image that you'd like to vignette in Photoshop. I renamed the "background" layer to "Lucky" so that later on I could place new images underneath.
2. In the toolbar on the left-hand side of your workspace, click on the Marquee Tool
Select the Marquee Tool shape you would like to use. In this demonstration, I used the Elliptical Marquee Tool to create a traditional oval shape for my vignette.
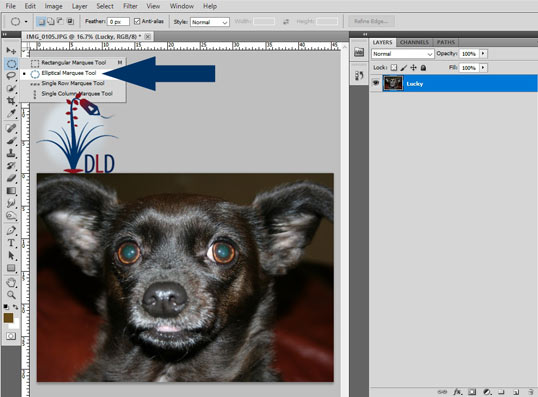
I created a traditional oval shape for my vignette by using the Elliptical Marquee Tool.
3. Click and drag the Marquee Tool shape over area to vignette
To emphasize my dog's face, I clicked and dragged the Elliptical Marquee Tool over his face. When I was happy with the oval shape, I released the mouse.
To move the Elliptical Marquee shape, click inside the “dancing ants” and reposition the shape until you're happy with the composition.
If you are not happy with the shape, you can click outside the “dancing ants” and redraw your marquee.
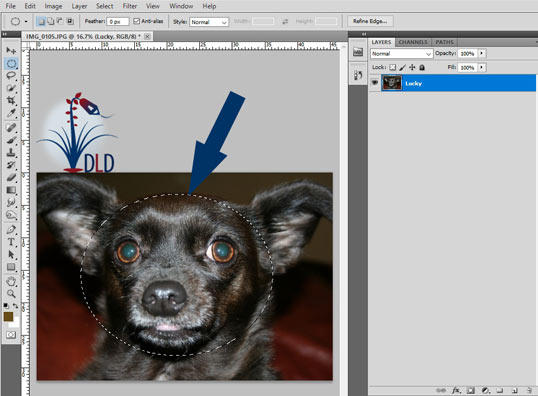
Hold down the mouse key and drag the Marquee Tool to define the outer area of your subject. The area outside of the "dancing ants" line will fade into the background.
4. On the upper Menu Bar, click on Select > Refine Edge
Select the Brush tool from the Tools menu. Set the foreground color to white, and choose the appropriate brush size and opacity.
On Photoshop's upper Menu Bar, click on Select, then Refine Edge.
Please note that in Photoshop CC, the Refine Edge dialog box has been replaced with the Select and Mask dialog box.
To access the classic Refine Edge dialog box in Photoshop CC, hold down the Shift key while you go to the Menu Bar, click Select, then click Select and Mask from the drop-down menu.
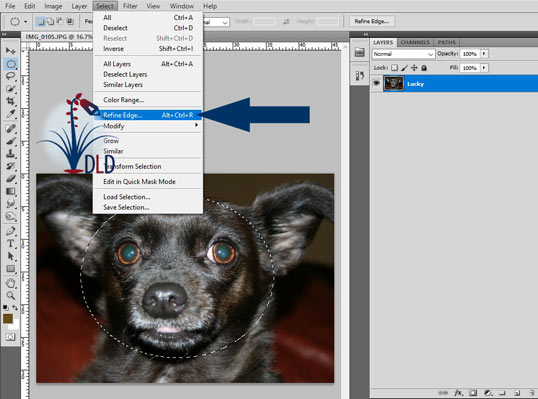
On the Menu Bar near the top of Photoshop's workspace, click Select, then Refine Edge.
5. In the Refine Edge dialog box, set Feather parameters
In the Refine Edge dialog box, you can use settings in the Adjust Edge section. For example, the most important setting I use is the Feather adjustment.
Adjust the Feather setting by sliding the adjustment bar to the right or to the left. In this example, I set the Feather adjustment to 220.0 pixels. In addition, I the Contrast parameter is 11%.
In addition, I also used the Shift Edge adjustment to include more of the eyes. For that setting, I entered +14%.
When you're happy with the appearance of your vignette, click the OK button.
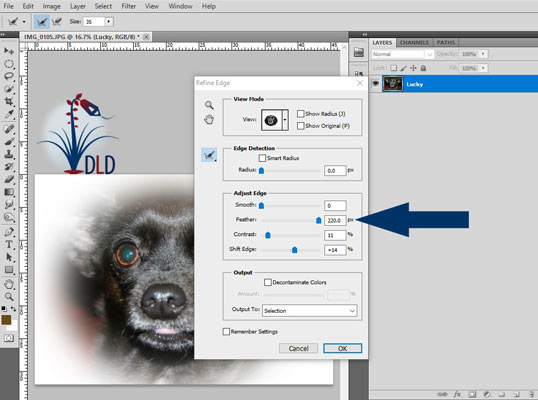
Adjust the settings in the Refine Edge dialog box. The settings determine how the edges of your image fade into the background.
6. With the image layer selected, click Add layer mask icon.
Then, click the Add vector mask icon located on the bottom of the Layers window. The result is a beautiful vignette with edges that feather off and disappear into the background.
At this point, you can save your new vignette as a png file, so the white areas will be transparent.
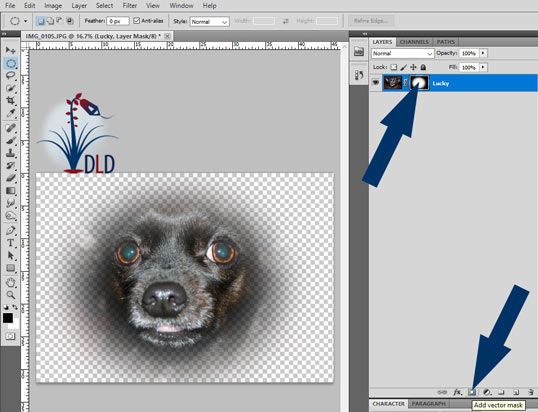
On the bottom of the Layers window or panel, click "Add layer mask" icon. You will then see the layer mask to the right of your image on the same layer.
7. Add a layer, draw a shape, select a background color
If you'd like to do more, you can add another layer underneath your image layer. Add a color, or add another image.
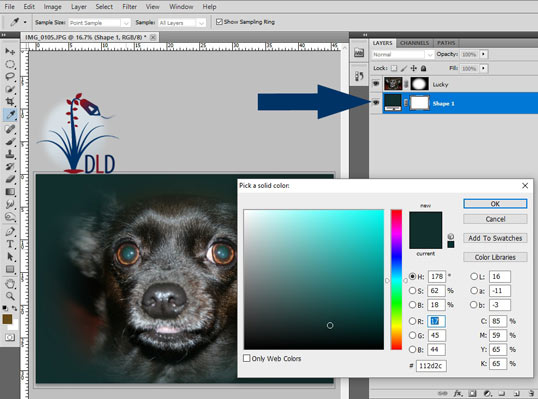
If you'd like, you can add a color or image to the background. Add a new layer and place it below your image on the Layers panel.
It is quick and easy to use Refine Edge to make a vignette
As you can see, it is quick and easy to use the Refine Edge dialog box along with a Layer Mask to make a vignette.
This method allows us to make vignettes that are consistent from image to image. Of course, you can also use the Brush tool to fine-tune your vignette, just as I described in a previous post.

Desert Life Design™ is based in the Phoenix, Arizona metro area. Here, we strive for perfection in graphic design and concise written communications.
