How to make a vignette in Photoshop
The Brush tool is an easy way to make a vignette in Photoshop
Here in the southwestern desert at Desert Life Design, we use graphic design, photography, and creative writing to create a compelling call-to-action.
Use the Brush tool to make a vignette in Photoshop
by Doug Martin
Desert Life Design™
There are many ways to make a vignette in Photoshop. For me, the easiest way to make a vignette and the one that allows the most flexibility, is to use the Brush tool.
What is a vignette?
Vignettes are used in literature, interior design, photography, as well as graphic design. The word vignette has different meanings depending on the discipline in which you work.
As a graphic designer, I think of vignettes as an image that has no border. Instead, the image fades off gradually towards its edges into the background (definition from yourdictionary.com).
Many ways to make vignettes in Photoshop
Just like many tasks in Photoshop, there are many ways to get the job done. In my work, I tend to use the method that gives me lots of flexibility while quickly getting the job done.
My favorite way to create a vignette in Photoshop is with the Brush tool.
How to use the brush tool to make a vignette in Photoshop
1. Open image for your vignette in Photoshop
Or, you can also place your image in an already-open document.
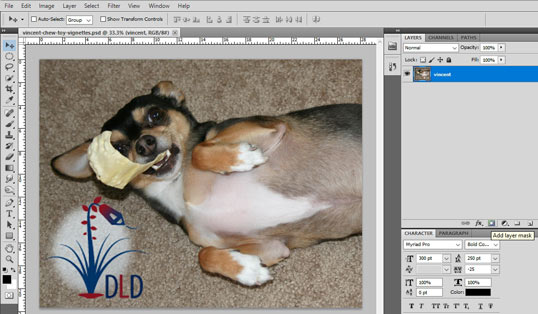
First, open an image that you'd like to vignette in Photoshop.
2. Hover over Layer Mask thumbnail and click
Hover your mouse pointer over the Layer Mask thumbnail and click. Now, you will see a Layer Mask icon beside the image you want to vignette.
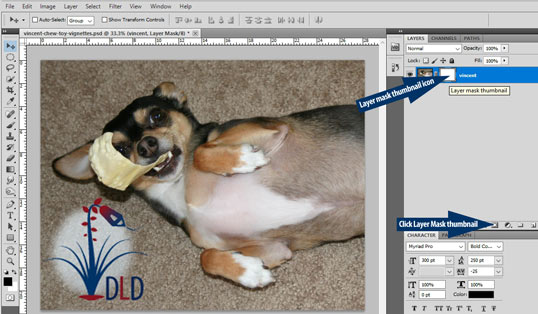
With the image layer selected, click on the Layer Mask thumbnail. You should now see the Layer Mask icon to the right of your image.
3. Click on Layer Mask icon to select it
Be sure to click on the new Layer Mask icon to select it.
4. Select the Brush tool
Select the Brush tool from the Tools menu. Set the foreground color to white, and choose the appropriate brush size and opacity.
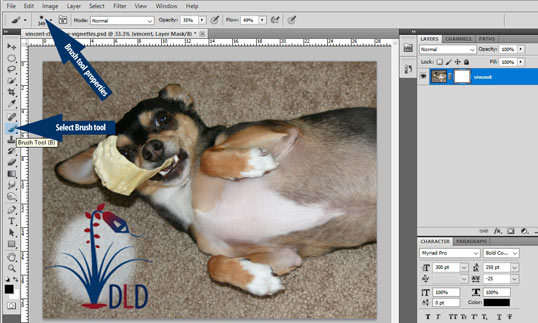
Select the Brush tool, choose the brush size and opacity. At the bottom of the tool bar menu on the left side, set the foreground color to white.
5. Brush around image edges
Use the Brush tool to brush around image edges. As you do, you will see the edges of your image disappear.
Continue to use the Brush tool to feather away your image. As you do, be sure not to brush over the subject in the image you would like to emphasize.
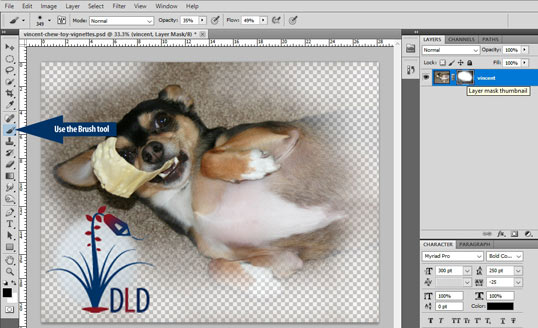
Paint over areas you want to fade into the background.
6. Add layers under vignette
If you'd like, add other layers under your newly created vignette.
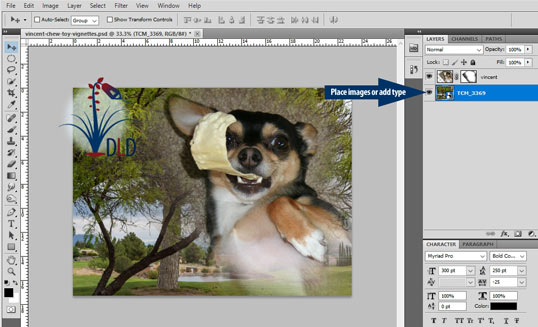
Add other layers under your new vignette, including other images, text, and graphics. (Please note: After I added the landscape layer underneath my vignette, I rotated the vignette for a more natural look.)
7. Use Brush tool to fine-tune vignette
If necessary, use the Brush tool to fine-tune your vignette. Make the brush size smaller for more detailed feathering.
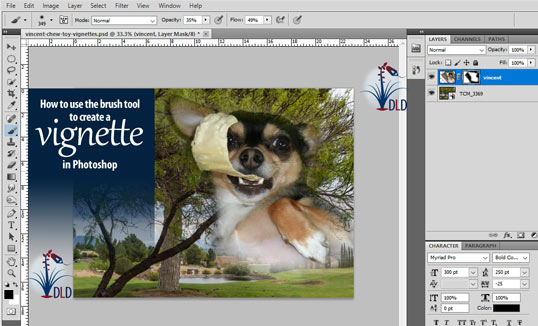
If necessary, reduce the brush size to fine-tune the vignette.
Other easy ways to create vignettes in Photoshop
I almost always use the Brush tool to create my vignettes in Photoshop. However, there are many other excellent ways to accomplish this task. Each method has its own varying degrees of flexibility, along with its own advantages.
For instance, my second favorite way of making a vignette is with the Refine Edge dialog box. The settings can be saved so all your vignettes will not only be beautiful, but consistent as well.

Desert Life Design™ is based in the Phoenix, Arizona metro area. Here, we strive for perfection in graphic design and concise written communications.
