How to use Wingdings typeface in Photoshop to add bullet points
Bullet points focus a reader's attention.
Here in the southwestern desert at Desert Life Design, we use graphic design, photography, and creative writing to create a compelling call-to-action.
Use Wingdings in Photoshops to add interesting symbols as bullet points
by Doug Martin
Desert Life Design™
Even though Photoshop does not have a menu item to add bullets or make a bulleted list of items, there are many ways to add bullets. An especially creative way to add bullet points in Photoshop is by using the Wingdings typeface.
What are bullet points?
Bullets, or bullet points, highlight important ideas in text. They are especially important for busy readers who skim through text as they look for the most important thoughts. Typically, a bullet is a solid round circle, but it might also be other simple shapes that relate to the text.
(This post assumes that the reader already knows how to access the text tool and draw a text box.)
How to use Wingdings typeface to make bullets in Photoshop
1. Position text cursor where you would like to add a bullet point.
2. Select Wingdings typeface from the drop-down Text menu.
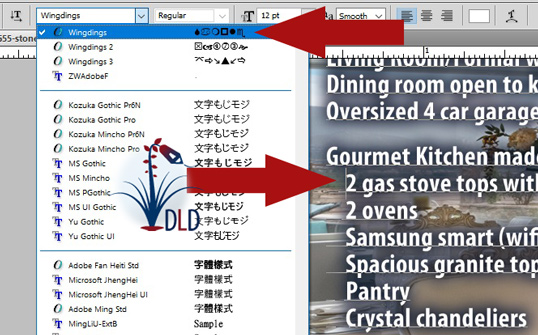
First, I placed my text cursor right in front of the words "2 gas stove tops..." (to the right of the bottom red arrow.) Then, I selected Wingdings from the text drop-down menu (to the left of the top red arrow).
3. Type the lowercase letter L for a large bullet (for this flyer, I used the lowercase W to get the diamond shape shown in the lower snippets).
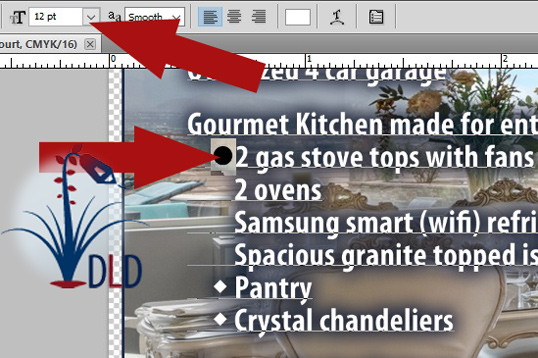
Each Wingding character has a different symbol that can be used as a bullet!
4. To reduce the size of the bullet, select it and select a lower point size.
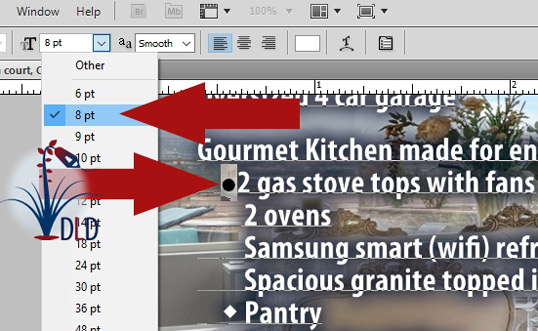
With your bullet selected, use the point size drop-down menu to make your bullet smaller or larger. In this case, I reduced the bullet from 12 points down to 8 points. With a smaller point size, the bullet now looks too low relative to the sentence it highlights. Read the next step to fix that problem.
5. To center bullet vertically, highlight it, go to Character window and adjust Baseline shift. In this case, I added a positive one point baseline shift.
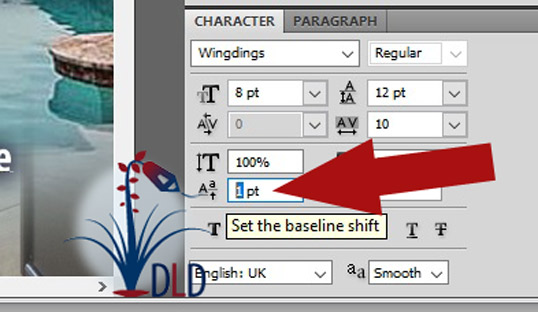
Adjust the Baseline to raise or lower your bullet vertically. In my case, I shifted the baseline up 1 point to make the bullet point look centered with the sentence that followed.
6. To make a bulleted list, copy new bullet and paste it to the beginning of each line.

Once you are happy with the size and position of your bullet point, copy it, then paste into the beginning of each sentence where you want the reader to pay special attention.
Use the handy Character Map app
To see how all the characters appear in the Wingdings typeface, use the Windows search bar and search for Character Map (Apple has a similar utility but accessing it might be different from Windows). The first selection should be the Character Map app. Click on it to open the Character Map application.
From there, you can double-click a bullet and it will appear in the “Characters to copy:” area below. Then, highlight your favorite bullet, copy, and then paste into your Photoshop document.
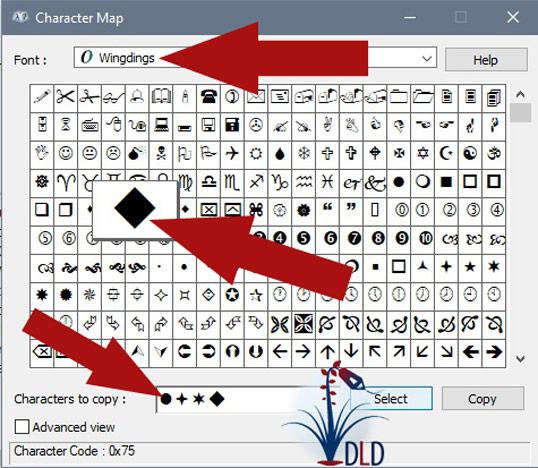
The Character Map makes it easy to choose a few of your favorite symbols to use as bullets. Once you've selected your favorite, copy-and-paste it into your Photoshop document.
Wingdings in Photoshop can make your bullet points stand out
In Photoshop, Wingdings is an easy way to quickly and creatively add bullet points to your important text.
I use Wingdings in almost every flyer I produce with Photoshop. In the future, I hope to try more symbols to make important text stand out with extra flair!

Desert Life Design™ is based in the Phoenix, Arizona metro area. Here, we strive for perfection in graphic design and concise written communications.
